What you're building
The VideoWall app tutorial demonstrates how you can control the size of a video playing in an app by using the Video Player component's Width, Height, and FullScreen features. The VideoWall uses media assets (videos stored in the app itself), but you can use the app to display videos from the internet as well.
This tutorial assumes you are familiar with the basics of App Inventor-- using the Component Designer to build a user interface, and using the Blocks Editor to specify the app's behavior. If you are not familiar with the basics, try stepping through some of the basic tutorials before continuing.
Getting Started
Connect to the App Inventor web site and start a new project. Name the new project VideoWall and set the screen's Orientation to Landscape.
Download the following video files* for use later on (right click and choose "Save Link As..."):
⦁ BigBuckBunny (bigbuckbunny.3gp)
⦁ NASA (nasa.3gp)
⦁ Sintel (sintel.3gp)
⦁ BigBuckBunny (bigbuckbunny.3gp)
⦁ NASA (nasa.3gp)
⦁ Sintel (sintel.3gp)
*Attributions for these videos are included at the end of this tutorial.
Introduction
The finished VideoWall app will display a wall of three videos that can be expanded to their true size and then shrunk back down again. The app will also allow you to display the videos in fullscreen. This tutorial assumes you have followed earlier tutorials to learn how the following blocks work:
⦁ Variables
⦁ Procedures
⦁ Button.Click blocks
⦁ Control (if-else) blocks
⦁ Variables
⦁ Procedures
⦁ Button.Click blocks
⦁ Control (if-else) blocks
This tutorial introduces the following:
⦁ Resizing the VideoPlayer
⦁ Showing the VideoPlayer video in fullscreen mode
⦁ Resizing the VideoPlayer
⦁ Showing the VideoPlayer video in fullscreen mode
Set up the Components
Use the component designer to create the interface for the VideoWall. When completed, the designer should look similar to the snapshot below.

First, you need to upload the video files. Click on the Upload File... button and select a video file downloaded earlier. Repeat this step to add the other two video files.
In the properties of Screen1, set the BackgroundColor to Black, the ScreenOrientation to Landscape, and the Title to VideoWall. Now create the interface by dragging and dropping the components from the Palette to the Viewer.
| Component Type | Palette Group | What you'll name it | Purpose of Component | Action |
| HorizontalArrangement | Layout | HorizontalArrangement1 | Holds all other components: makes the three vertical arrangements line up side by side | Set Width to Fill parent... |
| VerticalArrangement | Layout | VerticalArrangement1 | Holds the left-most VideoPlayer and controls (VideoPlayer1, ResizeButton1, and FullScreenButton1) | Set Width to Fill parent... |
| VerticalArrangement | Layout | VerticalArrangement2 | Holds the middle VideoPlayer and controls (VideoPlayer2, ResizeButton2, and FullScreenButton2) | Set Width to Fill parent... |
| VerticalArrangement | Layout | VerticalArrangement3 | Holds the right-most VideoPlayer and controls (VideoPlayer3, ResizeButton3, and FullScreenButton3) | Set Width to Fill parent... |
| VideoPlayer | Media | VideoPlayer1 | Displays the BigBuckBunny video | Set Source to bigbuckbunny.3gp , set Width to Fill parent... , and set Height to 36 pixels |
| VideoPlayer | Media | VideoPlayer2 | Displays the NASA video | Set Source to nasa.3gp , set Width to Fill parent... , and set Height to 36 pixels |
| VideoPlayer | Media | VideoPlayer3 | Displays the Sintel video | Set Source to sintel.3gp , set Width to Fill parent... , and set Height to 36 pixels |
| Button | User Interface | ResizeButton1 | Resizes VideoPlayer1 | Set Text to "Grow" and set Width to Fill parent... |
| Button | User Interface | ResizeButton2 | Resizes VideoPlayer2 | Set Text to "Grow" and set Width to Fill parent... |
| Button | User Interface | ResizeButton3 | Resizes VideoPlayer3 | Set Text to "Grow" and set Width to Fill parent... |
| Button | User Interface | FullScreenButton1 | Shows the VideoPlayer1 video in fullscreen | Set Text to "Show Full Screen" and set Width to Fill parent... |
| Button | User Interface | FullScreenButton2 | Shows the VideoPlayer2 video in fullscreen | Set Text to "Show Full Screen" and set Width to Fill parent... |
| Button | User Interface | FullScreenButton3 | Shows the VideoPlayer3 video in fullscreen | Set Text to "Show Full Screen" and set Width to Fill parent... |
Add Behaviors to the Components
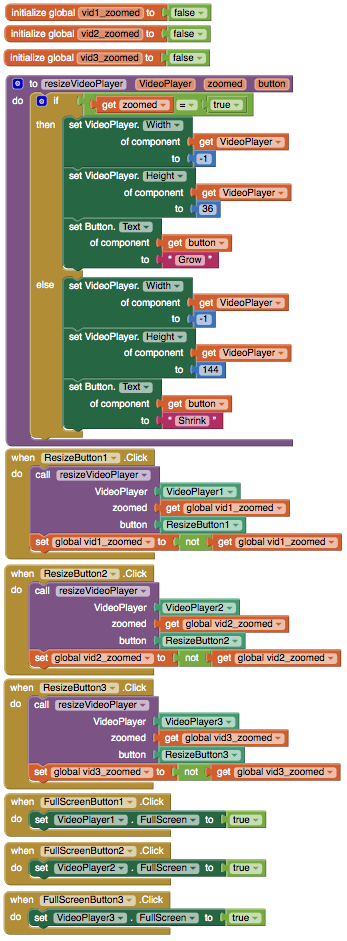
The interface is complete, but the buttons don't resize the videos yet. Open the Blocks Editor to add the behavior to the buttons. First, you'll define three variable blocks to keep track of the size of the VideoPlayers:
| Block Type | Drawer | Purpose |
| initialize global name to | Variables | Defines the vid1_zoomed variable (rename it) |
| initialize global name to | Variables | Defines the vid2_zoomed variable (rename it) |
| initialize global name to | Variables | Defines the vid3_zoomed variable (rename it) |
The three variables should like this:

Create the resizeVideoPlayer Procedure block. There are three VideoPlayers in the app, but you'll use one Procedure block to resize all three. To accomplish this simplicity, you will use the Any Component blocks component Any VideoPlayer blocks. To find the Any VideoPlayer drawer, scroll to the bottom of the block drawers on the left of your screen. Next to Any Component, click on the + sign and scroll down further to find the Any VideoPlayer drawer. Create the resizeVideoPlayer Procedure block using the following blocks:
| Block Type | Drawer | Purpose |
| Procedure | Procedures | Defines the resizeVideoPlayer procedure. Use the mutator ability of the procedure to add three arguments: x, x2, x3. (Change the names of these arguments to VideoPlayer, zoomed, and button.) |
| if then | Control | Defines the block that chooses whether the VideoPlayer is shrunk or expanded. Use the mutator to add in an else statement. |
| = block | Logic | Defines the equals block for testing if the zoomed block is true |
| true | Logic | Defines the block that zoomed is compared to |
| set VideoPlayer.Width (x2) | Any VideoPlayer | Sets the VideoPlayer Width to a number |
| 0 (x2), change to -1 | Math | Width to set VideoPlayer to |
| set VideoPlayer.Height (x2) | Any VideoPlayer | Sets the VideoPlayer Height to a number |
| 0 (x2), change to 36 and 144 | Math | Height to set VideoPlayer to |
| set Button.text | Any Button | Changes the button text |
| " " (x2) | Text | Text to set button to. Make one text block text's Shrink and the other's Grow. |
The resizeVideoPlayer block should look like the following:

The resizeVideoPlayer block will be explained later after you create the blocks for responding to button clicks.
Create the Click Blocks
The blocks you will create respond to clicks on the ResizeButton buttons. To build the three blocks, you will need the following blocks:
| Block Type | Drawer | Purpose |
| ResizeButton1.Click | ResizeButton1 | Defines the block for responding to clicks on ResizeButton1 |
| ResizeButton2.Click | ResizeButton2 | Defines the block for responding to clicks on ResizeButton2 |
| ResizeButton3.Click | ResizeButton3 | Defines the block for responding to clicks on ResizeButton3 |
| resizeVideoPlayer (x3) | Procedures | Starts the resizeVideoPlayer block for resizing a VideoPlayer |
| not (x3) | Logic | Defines the block for switching the various zoomed block values |
| set global vid1_zoomed | Variables | Sets the vid1_zoomed block to a different value |
| set global vid2_zoomed | Variables | Sets the vid2_zoomed block to a different value |
| set global vid3_zoomed | Variables | Sets the vid3_zoomed block to a different value |
| get global vid1_zoomed (x2) | Variables | Used to change the vid1_zoomed value. |
| get global vid2_zoomed (x2) | Variables | Used to change the vid2_zoomed value. |
| get global vid3_zoomed (x2) | Variables | Used to change the vid3_zoomed value. |
| ResizeButton1 | ResizeButton1 | Passed to the resizeVideoPlayer procedure |
| ResizeButton2 | ResizeButton2 | Passed to the resizeVideoPlayer procedure |
| ResizeButton3 | ResizeButton3 | Passed to the resizeVideoPlayer procedure |
| VideoPlayer1 | VideoPlayer1 | Passed to the resizeVideoPlayer procedure |
| VideoPlayer2 | VideoPlayer2 | Passed to the resizeVideoPlayer procedure |
| VideoPlayer3 | VideoPlayer3 | Passed to the resizeVideoPlayer procedure |
The blocks should look like the following:

Most blocks in App Inventor require you to know exactly what component your app will manipulate when you design the app. For some apps, you will have several of the same type of component and you want to program the same behavior for all of the similar components (like the VideoPlayer blocks in this app). The blocks in the Any component section allow you to build some general manipulation on some type of component. When you built the resizeVideoPlayer procedure block, you didn't know specifically which VideoPlayer would be used in the procedure. The resizeVideoPlayer works on VideoPlayers; but not until the resizeVideoPlayer block is used in the ResizeButton1.Click block (for example) is the specific VideoPlayer known.
Note: The VideoWall app could have been designed with a specific resizing procedure for each VideoPlayer. By using the Advanced blocks in a single resizing procedure, the app is much simpler.
How the Blocks Work
Setting the Width and Height property for a VideoPlayer works exactly the same way as setting the Width and Height of a Button. For whatever positive number is set, the video playing will resize its appearance to fit that value. There are two values that are exceptions to the using positive values rule: -1 and -2. Setting VideoPlayer.Width or VideoPlayer.Height to -1 is like setting the Width or Height to Fill parent in the designer. Setting VideoPlayer.Width or VideoPlayer.Height to -2 is like setting the Width or Height to Automatic in the designer.
Warning: You can set the VideoPlayer Width and Height to any positive number you want. The VideoPlayer will change its size to match the values you set; but on some devices, the VideoPlayer does not change its size correctly. The behavior on such devices is usually unpredictable.
Test this behavior. Click on the Grow button below the BigBuckBunny video. The video's size should expand, and the text of the button should change to "Shrink". Click on the Shrink button below the BigBuckBunny video. The video's size should shrink back to its original size and the text should change back to "Grow".
Create the blocks for showing fullscreen video
You will now add the blocks for showing the videos in fullscreen mode. Use the following blocks:
| Block Type | Drawer | Purpose |
| true (x3) | Logic | Value to set FullScreen as |
| FullScreenButton1.Click | FullScreenButton1 | Responds to clicks on FullScreenButton1 |
| set VideoPlayer1.FullScreen | VideoPlayer1 | Used to show fullscreen video |
| FullScreenButton2.Click | FullScreenButton2 | Responds to clicks on FullScreenButton2 |
| set VideoPlayer2.FullScreen | VideoPlayer2 | Used to show fullscreen video |
| FullScreenButton3.Click | FullScreenButton3 | Responds to clicks on FullScreenButton3 |
| set VideoPlayer3.FullScreen | VideoPlayer3 | Used to show fullscreen video |
The blocks should look like the following:

How the Blocks Work
The VideoPlayer.FullScreen block takes a true/false value (also called a boolean) to tell it whether to go full screen or not. Setting a VideoPlayer.FullScreenblock to true causes that VideoPlayer to be displayed in fullscreen mode. If there is another VideoPlayer in fullscreen mode, that VideoPlayer's .FullScreen value is set to false and it is replaced with the current VideoPlayer. If a VideoPlayer.FullScreen is true, setting a VideoPlayer.FullScreen block to false causes the fullscreen mode to be exited and the app's interface to display. Test this behavior. Start playing the BigBuckVideo, and click on the Show FullScreen button below the BigBuckBunny video. The app's interface should disappear and some media controls with the BigBuckBunny video should appear. Use the Back button on your device or the emulator to exit fullscreen. The app's interface should appear.
Final Program
VideoWall Final Version
Package the final version of the app by choosing Build | App (provide QR code for .apk) from the Component Designer menu. When the barcode appears, use the barcode scanner on your phone to download and install the app. For more information on sharing and packaging apps, click here.
Variations
Now that you have finished the first VideoWall app, you might want to build some variations. For example:
⦁ Get more video files and add a second row to create a real VideoWall
⦁ Use videos from an online server.
⦁ Expand the resizeVideoPlayer procedure to resize VideoPlayers by small increments to create an animation effect. You could use multiple Clocks to start the resizeVideoPlayer procedure and animate multiple VideoPlayers at once.
If you distribute your app to others, make sure you respect any license requirements for the videos you use.
Below are the attributions to the video files included in this demo app. The creators of the source videos that these clips are from do not endorse App Inventor.
| Video File | Information | Attribution |
| bigbuckbunny.3gp | A clip from the full length film | (c) copyright 2008, Blender Foundation / http://www.bigbuckbunny.org |
| nasa.3gp | A formatted version of the Mars' Whirling Dust Devil clip. | Here is the original video. |
| sintel.3gp | A clip from the full length film | (c) copyright Blender Foundation | http://durian.blender.org |
Scan the Sample App to your Phone
Scan the following barcode onto your phone to install and run the sample app.

Download Source Code
If you'd like to work with this sample in App Inventor, download the source code to your computer, then open App Inventor, click Projects, choose Import project (.aia) from my computer..., and select the source code you just downloaded.
Tutorial Difficulty:
- Intermediate
Tutorial Type:
- Video