2017년 5월 22일 월요일

Duplicate Screen components


Is there a way to duplicate the screen and its components ? A new button to duplicate the current screen (next to "Remove Screen") could be added and beneficial in certain cases. The blocks can be copied onto the back pack and unpacked on to the new screen, in the same way an option to duplicate the screen and its components as viewed in the designer tab will be helpful and will save time in recreating and naming and setting the properties of each of the components. 

Could this be brought to notice of the developers for the next update ? 

--
Making two screens that are almost the same is almost always not a good idea. If you become better at using App Inventor you will find out how you can make abstractions, load new data in bottons or labels or other fields and how you can make parts of your screen visible/invisible when needed.
As this question has come up many times, with always a similar answer as mine, what you wish is not going to happen, although, what would be really nice is to be able to rename Screen1 one in a more strainghtforward way and use another screen as Screen1.

-- 
Thanks for the guidance.. Will look up the link n try it out.. Cheers


--
Thank you for the reply.
Well I m not looking to keep the screen exactly the same I just want to keep most of the components and the properties that was painstakingly set for each component. Other wise I will have to start from blank screen and go back n forth between screens to make all the properties of ,say a button or a label, the same. It is easier to delete the unwanted components than to recreate components which is of same properties.
So what I was hoping is to duplicate the screen I want and give it another name. Then delete the components that I don't want or add more components to fit the requirement.
I have read that making components visible/invisible is ideal than making additional screen, but even there the option to duplicate , say a button or label I just crated and set the properties to the requirement, is not there. I was hoping for such a feature just to help speed things up a bit. Anyway as of today, I understand that such an option is not there.
So thanks for the quick suggestion and will try out the suggestions in the link posted by Nico. Thank you guys.


--
What I usually do when I have a lot of buttons or sprites that need to be aligned or have the same color etc., I make a list of them and go through the list using the any blocks to set specific properties. Your design will look ugly on the design screen, but your user will not notice.

--
Thats right Ghica. Setting the propeties using blocks makes it easier to replicate the same properties for differeint items but this further increases and crowds the screen. It is because of so much crowding in the design that I prefer to use different screens than make items visible / invisible.

@ Nico I tried the solution sugested in the link that was provided.I copied the screen and packaged it back to .aia and was able to upload it to AppInventor and also open it. But as soon as I open the copied screen, it gives me an internal error has occured report and guides me to a report a bug. I have reported the bug. I have tried this to duplicate a screen, deleting an existing screen and adding the copied screen. I have not touched the Screen1, it remains as it is. When I open the old screens, there is no error. Only when i open the copied screen, the error dialog shows up. Have done exactly whats was said in the link but cant seem to avoid the error report.

Also saw a youtube video https://www.youtube.com/watch?v=hhdvRp1UfmM (seems recent), but that too doesn't work. Gets the same bug result.


Don't know if this helps but this was from the bug report 

notes = Browser: Mozilla/5.0 (Windows NT 6.1; Win64; x64) AppleWebKit/537.36 (KHTML, like Gecko) Chrome/58.0.3029.110 Safari/537.36
foundIn = nb155
faultData = java.lang.IndexOutOfBoundsException
projectId = -1

-- 
The only dependable way to work with the .aia is using 7zip and notepad++ (on windows). And make sure that you do all editing without unpacking the zip file. If you unpack the zip file relative folder addresses will be added when you repacke the zip and AI cannot handle that.
And, if you are copying screens, do not forget to change, update all files related.

-- 
|it gives me an internal error
This is very strange. I had something like that when I tried to duplicate the screen.
But I cannot help you.

-- 
@ Nico, you said you had something like that.. So does it mean the internal error is not there anymore. If its not, do you remember how it went away. If its still present, then no worries. Thanks for the help and suggestion. @ Ghica as well.. Thanks for the support.

-- 

Control an Arduino With Android and USB


This instructable is just a very quick demonstration of the "Arduino USB Serial Extension" that was created by Thunkable developer, Pavitra. It's still being developed so think of this as a sort of beta version.
In a nutshell, you can now create a custom Android app and use it to communicate via USB with many different Arduino boards.
I've prepared a simple demo where the app can switch an RGB LED between 5 different states (Red, Green, Blue, White and Off) but I'm really interested to see what ideas the Instructables community comes up with.
Step 1: What You Need


Prerequisites
1. Some basic knowledge of block-based programming, such as Scratch or App Inventor
2. A basic understanding of Arduino - i.e you have successfully run the "Blink" sketch

Hardware
1. An Arduino + USB Cable. I've tested this with an Uno, Leonardo and Micro.
2. An Android Phone
3. A USB OTG connector
4. Some electronics parts for testing

Software
1. The Arduino IDE
2. Any "App Inventor 2" compatible software, I've opted for Thunkable
3. A copy of Pavitra's Arduino USB Serial ExtYou could easily get away with just the Arduino itself here and use the on-board LED, but to make it a little bit more interesting I've used an RGB LED.
Step 2: Build Your Circuit


The circuit is very simple:
The ground pin of the LED is connected to any of the Arduino's ground pins [Black Wire],
The red, green and blue pins are connected to PWM pins via Ω resistors. You can recognise PWM pins by the ~ symbol beside the pin numbers.
The red, green and blue wires in the diagram are there simple to illustrate which leg of the LED corresponds to which colour. In some LEDs the blue and green pins might be reversed.

Step 3: Write Your Code
All of the code below can be found on Github
Start by setting up some variable names for your Arduino Pins

//variable for Serial input int input = 0; //Pins for LEDs const int LED = 13; const int redPin = 11; const int greenPin = 9; const int bluePin = 10;
Next, add this to the setup() function:
void setup() { //Start the serial monitor at 9600 baud Serial.begin(9600); //Declare the LEDs to be outputs pinMode(LED, OUTPUT); pinMode(redPin, OUTPUT); pinMode(greenPin, OUTPUT); pinMode(bluePin, OUTPUT); }
Then check for Serial input:
void loop() { //check if there's incoming data, if(Serial.available() > 0){ //if so, then read the incoming data. input = Serial.read(); //make different colours depending on the input value if(input == '1'){ make_colour(255,0,0); } else if(input == '2' ){ make_colour(0,255,0); } else if(input == '3' ){ make_colour(0,0,255); } else if(input == '4' ){ make_colour(0,0,0); } else if(input == '5' ){ make_colour(255,255,255); } } }
Finally, make the appropriate colour:
void make_colour(int r, int g, int b){ //just for testing Serial.println("Making Colour"); //sets the duty cycle for each pin analogWrite(redPin, r); analogWrite(greenPin, g); analogWrite(bluePin, b); }

Step 4: Create Your App


To get started with the app as quickly as possible you can clone it directly to Thunkable by clicking here.

Design

The design of this app is intentionally basic. It's just a few buttons and, of course, the Arduino extension file.
If you're unfamiliar with installing .aix files you can read Conor's quick start guide here.

Code
In the blocks, I've created a procedure called lighsOn which is called every time a button is pressed.

The red, green and blue buttons send the characters '1', '2' and '3' to the Arduino, respectively.

The characters '4' and '5' are used to turn the LED white and off.

It's also a good idea to include a reset button that closes and then re-opens the connection to the Arduino

Step 5: Try It Out


Now you're ready to test it out.
1. Upload the sketch to your Arduino
2. Install the .apk on your Phone
3. Connect your phone to your Arduino with the OTG Cable and you're good to go.

Troubleshooting.
When you first run the app with the Arduino connected, you need to give it permission to access the USB device (the Arduino)

If you see the run time error, try closing the connection and then opening it again. This should fix your problem, but bear in mind that this is still being tested so please leave a comment if it doesn't work out for you.


Produced by AI .txt file is not "visible" by my desktop


Dear friends im facing the following problem: I have done an application in AI2 that in its end, produces using the ".SaveFile" block,  a XXXXX.txt file stored in the "Android" folder (or in any other folder is desirable!) of a tablet. This tablet is connected through USB connection to my desktop. When I try to access this file through my desktop running windows 7, it is not "visible" by it, although it is really stored in the "Android" folder (I can see it!!!). If I store it to another folder (for example in "Alert") and copy-paste it to the "Android" it is normally "visible" by my desktop. Could someone help me? Is the storage of the AI2 responsible for that or something else is happened?

--
Best to save data you want to access via PC etc. to the "sdcard" or folder within it, other folders may not allow files to be viewable 

-- 
how do you save the file?
It would really help if you provided a screenshot of your relevant blocks, so we can see what you are trying to do, and where the problem may be.

--
the blocks are as can you see above. The "FilePath" is provided as: "/Android/swdata.txt"
Thank you and Tim for your interest. I will try also Tim's idea.

-- 
.... I would like to add to the above comments that I tryed to save to "sdcard" but it seems that my tablet has not such folder. Instead I tryed to save the produced file in "/DCIM/Swimmer/XXXXX.txt". The file is now saved normally but still the desktop doesnt "see" it. The surprising element is that if I "click" on the file in my tablet with my finger,  then immediately the Desktop sees it!!!!

-- 
... additionally to the above I would like to note that I tryed to save my file to the "sdcard" but it seems that my tablet has not such folder. Instead, I saved it to the "/DCIM/Swimmer/XXXXX.txt". It has been saved normally but still the desktop doesn't see it! The surpising element is that when I "click" with my finger on the file on my tablet, while the computer is looking for it, it is "seen" by it!!!!!

-- 
... additionally to the above I would like to note that after adding an SD card to my tablet, I tried to save my file to the "sdcard" but it seems that the file is not saved in SD card (I really dont undrestand why!). The path I gave is: "/sdcard/swdata.txt". I get the message:" The file: /Storage/emulated/0/sdcard/swdata.txt" could not be created. Instead, I saved it to the "/DCIM/Swimmer/swdata.txt". It has been saved normally but still the desktop doesn't see it! The surpising element is that when I "click" with my finger on the file on my tablet, while the computer is looking for it, (sometimes) it is "seen" by it!!!!!

-- 
are you able to find the file, if you use a file manager app directly on your device?
the file component of App Inventor is only able to save files in the internal sdcard...

if you use /swdata.txt the file should be saved in the root directory of the internal sdcard

-- 

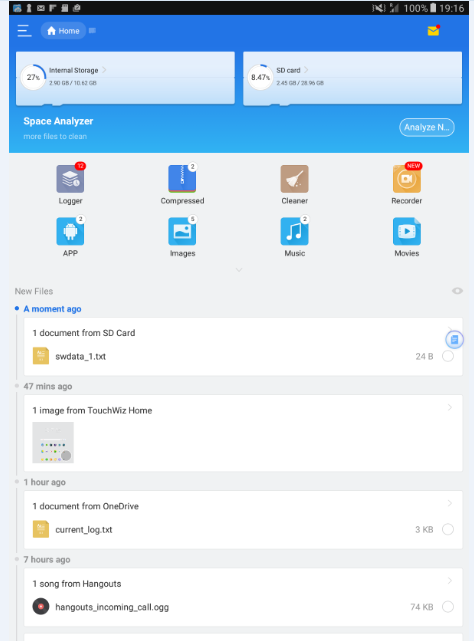
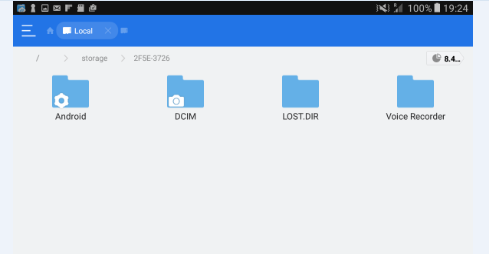
Using a file Manager I get the screenshot shown above. It seems that the file of interest exists in the SD card! (the length of the file is 24Bytes?!?!?!). However if I enter in the SD card, I can't find it as you can see in the following screenshot! Also the search results are negative when I am searcing for it, in the tablet contents:


I really appreciate your help.

--
This tablet is connected through USB connection to my desktop. When I try to access this file through my desktop running windows 7, it is not "visible" by it, although it is really stored in the "Android" folder (I can see it!!!)


try these tips
https://www.google.com/search?q=android+usb+file+not+visible+on+windows

-- 
Nothing! I am completely dissapointed! I tried almost everything.
Although Im writing the produced file as: /swdata.txt in the tablet (including an SD card) it is stored in the Device Storage and NOT in the SD card as it is expected according to:

http://ai2.appinventor.mit.edu/reference/components/storage.html#File
In this case the file is not seen by the desktop, except if I copy and paste it to another folder of the tablet!

If I include: /sdcard/swdata.txt Im getting a error message: Error: the file could not been saved in /Storage/emulated/0/sdcard/swdata.txt
If I map the tablet as drive Z: (using a suitable program) the desktop is able to "see" the tablet's files but not the SD card.
I cant really understand the reason why AI2 does not produces immediately "visible" .txt (or may be of other type) files!!!
A question that arises: is it possible to produce using AI2 another type of archive, for example EXCEL file or to send the data directly through USB connection to the desktop or I will face the same problems again??

-- 
Using a file Manager I get the screenshot shown above. It seems that the file of interest exists in the SD card!

which means, it's not an App Inventor issue...
and as already said, the file component can only store files in the internal sdcard (and NOT in the external sdcard)

the links https://www.google.com/search?q=android+usb+file+not+visible+on+windows should give you a solution how to find the stored file using WIndows

you can't create excel format, but csv format, which you can import into Excel

 or to send the data directly through USB connection to the desktop

you might want to try Jörg's SMP Manager extension

-- 
Consider using a Fusion Table to collect your data in AI2.


Benefits:
⦁ You can see the data on the Web AND on AI2
⦁ You can share the data with others
⦁ You can export it in csv format
⦁ You can run most SQL against it (no JOINs, though)
⦁ Data is stored in your (mostly) free Google Drive

Start with the Pizza Party tutorial.

-- 
Dear Taifun and Abraham, I really appreciate too much your help.
I will try your suggestions and I will let you know.

-- 
If my understanding is right, the method of using Fusion Table needs an active connection with the internet in order to retrieve the data. This is not desirable, since I am working (in the context of my Masters Thesis) on the implementation of a portable system with no such capability.
Could you suggest me an alternative solution?
For example could I transfer the file (containing just four (4) numbers and nothing else!!!) using the direct USB connection with the desktop?

-- 
Here are more things to try ...

(Server Message Block protocol creates network shares for Windows)


Bluetooth 
Does your PC have Bluetooth?
Some laptops do.

Voice output
(Modern PCs have speech input, rarely used)

Grabbing at straws,

-- 
A Fusion table requires an active Internet connection.  You can store text data on your device using a TinyDB.

You are using your phone/tablet to connect with App Inventor using a USB cable?   If you are doing that, you had to load software on your PC and change a setting in the Developer's options on your Android using the Settings on the device., if you want to access a file stored on the 'internal SD' card .. you have to reset the so that your device responds as a media device. If you save a text file on your device on the internalSdCard, you can read it on your PC provided you save it with a .txt suffix.  Just plug your Android into your PCs usb slot and then brows for your file using File Explorer on your PC.

If you create a text file, you should be able to eMail it to your self.  How you do this depends on the text file and where it is stored.

Save many txt files in a TinyDB on the device and later retrieve them to display or eMail the text.

--
Lets state the problem again: I'm using the following arrangment: One desktop PC running windows 7 is connected permanently through a USB cable to a Samsung tablet running Android. In the tablet an application developed by us, using AppInventor, creates a XXXXX.txt file upon some event occurance. The blocks creating the file in our app are shown above in my post of 18 May. The storage path is : "/Android/XXXXX.txt", or (we tryed also) directly: "/XXXXX.txt"
We have mapped also the tablet (Using MTPDrive software) as external Drive Z:\ to our PC. Our desire is, when the XXXXX.txt is produced in the tablet it must be "seen" immediately and without our intervention to the file manager of the desktop. The problem with this arrangment is that although the file is produced, it is not "visible" by the desktop. If we copy this file from the tablet's sdcard (or from the Adroid file-if it is stored there) and paste it to the same folder, it is immediately seen by the desktop. Sometimes the XXXXX.txt file is also "seen" if we mannually search in the desktop in other directories, open a randomly selected  file, close it, and then return to Z:\.
Regarding your answer please clarify the following points:
"If you are doing that, you had to load software on your PC ..."
what "softwre do you mean? The MTPDrive for example, or something else?

"and change a setting in the Developer's options on your Android using the Settings on the device., if you want to access a file stored on the 'internal SD' card ..  
can you be more specific to which setting are you refered because we have tryed a lot but with no result?

"you have to reset the so that your device responds as a media device."
something has been missed between "the" and "so"?

"If you save a text file on your device on the internalSdCard, you can read it on your PC provided you save it with a .txt suffix."  
it has been done exactly in this way.

Thank you for your interest. 

-- 
Our desire is, when the XXXXX.txt is produced in the tablet it must be "seen" immediately and without our intervention to the file manager of the desktop. The problem with this arrangment is that although the file is produced, it is not "visible" by the desktop     


You  can NOT do that.  You are using the USB debugging feature to develop.  You cannot simultaneously use the device as a PC drive  AND as a AI development too.  You cannot view files from your device using the FileManager on your PC at the same time you are running the app.  Connecting the device to the PC without  USB debugging only allows you to VIEW files that are on the device when the app is not running.

You said " the method of using Fusion Table needs an active connection with the internet in order to retrieve the data. This is not desirable, since I am working (in the context of my Masters Thesis) on the implementation of a portable system with no such capability."    This means you will not have a network connection.  However, you could design your app to show the several numbers you are collecting on your Android and not have to send store the file but could later upload it when you get where you have a connection.

You might look at this app  http://jabmobilecomp.strikingly.com/   (the plant data one first and possibly the species area one)   and see if it meets your needs. The app downloads field data and stores it internally using a TinyDB and can be later used to upload data to a FusionTable.

Regarding your answer please clarify the following points:
"If you are doing that, you had to load software on your PC ..."
what "softwre do you mean? The MTPDrive for example, or something else? from  
Connecting to a phone or tablet with a USB cable   


Setting up a USB connection can be awkward, especially on Windows machines, which need special driver software to connect to Android devices. (This is not the case with Mac or Linux, which do not need special drivers.) Unfortunately, different devices may require different drivers, and, outside of a few standard models, Microsoft and Google have left it to the device manufacturers to create and supply the drivers. As a consequence, that you may have to search on the Web to find the appropriate driver for your phone. App Inventor provides a test program that checks if your USB-connected device can communicate with the computer. You should run this test and resolve any connection issues before trying to use App Inventor with USB on that device.

"and change a setting in the Developer's options on your Android using the Settings on the device., if you want to access a file stored on the 'internal SD' card ..  
can you be more specific to which setting are you refered because we have tryed a lot but with no result?


To get the usb to work, you had to do this:


Step 4: Set up your device for USB (Turn USB Debugging ON)

On your Android device, go to System Settings, Developer Options, turn them on, and be sure that "USB Debugging" is allowed.
On most devices running Android 3.2 or older, you can find this option under Settings > Applications > Development.
On Android 4.0 and newer, it's in Settings > Developer options.
Note: On Android 4.2 and newer, Developer options is hidden by default. To make it available, go to Settings > About phone and tap Build number seven times. Return to the previous screen to find Developer options, including "USB Debugging".

You need to undo this.  Then unplug the USB from the PC, then plug it back it; when you plug it back in the phone will work like an extra disk drive on the phone.


"you have to reset the so that your device responds as a media device."
something has been missed between "the" and "so"?    the USB debugging  
In your case USB debugging is checked; just uncheck it and then replug the device back into your PC.

"If you save a text file on your device on the internalSdCard, you can read it on your PC provided you save it with a .txt suffix."  
it has been done exactly in this way.     Provided that you disable USB Debugging you should be able to find the file on the phone.  Where it will be depends on the file path you provided.

What you are trying to do is very awkward.  I would just email the text that is in the file to yourself but you got to do what you got to do since you cannot or use a technique like the species area map does.

-- 
Does the new file appear when you press F5 in your Windows File Manager window?

If so, maybe this will help ...

-- 
finally and with your helpfull guidance we found the following solution:
in the Windows command prompt I wrote: C:∖Users∖USER∖xcopy C:∖∖Test Z:∖∖
where "Test" is an empty folder. The desktop writing the empty folder in the tablet (which using the MTPDrive software has assigned as drive "Z:∖∖") returns the new content of the sdcard of the tablet.
Thus the XXXXX.txt file contained in the tablet is finally visible by the desktop and can be used by another software running in it.
Thank you for your time and your valuable assistance
Ioannis  

-- 
Very glad you found a solution Ioannis.  What you are doing to store/view the data appears very awkward.  It evidently works for you. I expect there are better ways to handle and save your data collection (see the links I provided for two possible solutions).  

--  
it really works very efficiently. I tryed all methods proposed, but without result. For example: Pressing F5 the file is still not vissible. I tryed to make a single copy through the Windows command propmt of the contents of Z:\ to C:\ with no result. I tryed to change the settings of my tablet (it will take a lot of pages to describe all what I have tryed) also with no result. I tryed (using the application running in the android environment) to copy and paste the file to another folder inside the tablet, nothing (although this process works "manually"). So I am very happy with this working solution!

-- 


How do you pass a user interface component as an argument (AI2)?


I need to be able to manipulate the attributes of a an interface object from within a procedure, based on which component called the procedure.  A simplified example;  I have several buttons each of which calls a procedure named "changeStuff"'. When "changeStuff" is called, it changes the text and textColor of the calling button.  I can not figure out how to abstract and pass the calling object.   The only way I see to accomplish is through a lengthy IF/ELSE IF statement within the procedure (which negates it's purpose) and repeat each block code explicitly for each possible button.  Not efficient and I know there is a way, but my OOP is lacking.  any thoughts????

by the by.. I see that most UI components have a 'get' block option with just the component name therein.  What is this for?  I can find no documentation on it.

--
You can do this using the 'Any' blocks at the bottom of the Blocks Editor palette,
passing them the component blocks (last in the palette) of each and any
component you want to handle.

The component blocks can be gathered into lists at Screen1.Initialize
time (not before) or referenced by name if unique.

Here's a link to documentation of a test app using this tevhnique
on balls ...

Angry Balls V3 Documentation

--

Angry Balls V3 Documentation


Abe Getzler


This is a simulation of ball collision in the case where the cue ball hits a stationary  target ball.


(The project name came from my initial attempt to launch the cue ball
from a slingshot.  I gave up on that mechanic, but kept the cute name.)


The cue stick, cue ball, and target balls can all be dragged around to
set up shots.


This is a partial result.  It only works for collisions against stationary balls.
That's why I called it V3.


Screen shot


Designer


The screen components include a canvas with a cue stick, cue ball, and target balls, plus controls.  The controls include speed and friction sliders, and four buttons:  Reset, Shoot, Pause/Resume, and Options (speed).  For debugging, there’s a List Picker to show a log of calculations.


Dragging


The draggable cue stick, cue ball and target balls let you set up shots


Aiming


The cue stick always points to the center of the cue ball when dragged:
Its graphic is a 2 by 100 bar, given a 4 by 100 size to make it easier to grab.


We keep track of all our balls at initialization time…


Resetting the board…


The four buttons: Reset, Shoot, Pause/Resume, Options …
The Options button reveals a speed slider.


Pause/Resume


The Pause/Resume button is used to Pause and Resume alternately, depending on its Text.  

⦁ To Pause, it collects the balls’ speeds, saves them in a list with their components, and sets their speeds to zero.  
⦁ To Resume, it goes through that list of saved balls and speeds, and resets the balls’ speeds from their saved values.


The Shoot procedure sets the pool cue in motion towards the cue ball.


When the cue stick hits the cue ball, transfer its speed and direction to the cue ball …


We make the pool cue invisible and disable it so it doesn’t interact with other balls.
This also helps to hide the pool cue stabbing thru the cue ball, though you can catch a glimpse of that happening if you are quick.


To avoid a cannibalism effect, we keep a list of balls that are in the midst of a collision.  This will be used to stop multiple CollidedWith blocks from handling the same collision.  The TargetBall event blocks are coded for each target ball, not shown here but following the same pattern.


When the collision is over, remove the balls from the colliding balls list …


When balls hit the edges of the canvas, have them bounce off the walls. Extra Target Balls get their own copies, not shown here.
There’s a bug here - when a ball hits a corner it sticks to the corner.  If there were a “DepartedEdge” block I might be able to deal with it.  It’s no big deal for a little demo like this.


The Pool Cue


When the pool cue hits the cue ball, we give the cue ball the speed and heading of the pool cue, then remove the pool cue from action.


Ball Collisions


Collision of balls is handled by a procedure that accepts as arguments the two colliding balls’ components.  For this simplified case we deal only with a cue ball hitting a stationary target ball.
This procedure it triggered when any ball hits any other ball.


We will ignore collisions with balls that are already colliding, as recorded in the colliding_balls list.
We add the two colliding balls to the colliding_balls list, and leave it to the NoLongerColliding blocks to “uncollide” them from that list.


First half of the bounce procedure


We send the target ball off in the direction of a line from the cue ball to the target ball.  This is done the easy way, by using the Ball.PointTowards block to point the target ball towards the cue ball, then reversing the target ball’s heading by subtracting 180 degrees from it.


Normalizing directions to avoid anomalies


The expression of directions as degrees is problematic, because there is always a place on the dial where there will be a discontinuity, the same way the International Date Line can cause air travelers in the Pacific to gain or lose a day by crossing this imaginary longitudinal line.  


We will choose between two different normalization schemes to express our angles, to keep the discontinuity behind the cue ball so it doesn’t mess up our bounce calculations.


⦁ Normal180 will bring an angle into the range -180 to 180. This good for directions heading to the right of the canvas.
⦁ Normal360 will bring an angle into the range 0 to 360.  This good for directions heading to the left of the canvas.


We add or subtract 360 degrees to our input angles to bring them into our desired ranges.
We will package up the choice between these schemes in a single normalization procedure:


Second half of the bounce procedure


The angle of incidence is defined as the angle between the incoming cue ball direction and the outgoing target ball direction.  For a head-on collision, the angle of incidence would be 0 degrees.  It can range between -90 and +90 degrees.


We then transfer some speed from the cue ball to the target ball, taking care to conserve energy and momentum in the x and y directions. For a frictionless spinless collision with a stationary ball of equal mass and size, the speeds are proportional to the sine and cosine of the angle of incidence.  ((sin(theta))^2 + (cos(theta))^2 = 1)


The cue ball heads off at right angles to the target ball heading in this special case, heading off to the left or right (+/- 90 degrees) depending on which side of the target ball it hit, as measured by the sign of the angle of incidence.


To avoid a negative speed for the cue ball, we take its abs() value.
Intermediate angles are logged at three stages of this process for debugging.


Rolling Friction


As the balls move, we can slow them down to simulate friction.
The rate of speed loss is controlled by a slider and a clock.
The default is no friction, because I enjoy watching the balls bounce.
This code comes from scottfromscott, app-inventor-developers-library@googlegroups.com


Sources


Feel free to copy this with attribution.


This doc …


Friction code:  App Inventor’s Developer Library (scottfromscott)

More projects